Still nothing picture-worthy. I've been working on making a bed. The two attic rooms will be guest bedrooms - Grandma likes to have her grandchildren visit, and has made those two rooms into bunkhouses for the kids. Including Grandma's bed in her second floor bedroom, I'll need at least 5 beds of various sizes and styles.
I'm also starting to add the baseboard trim to different parts of the house. It seems that there is no trim for the interior doors, so I'll be making that too.
I'm a little hesitant to attach the front of the house - there's still a lot to do, and in half scale, you want to keep as much room as possible for access until the details are done. Before I attach the front, I'll need to finish the floors, baseboard, the molding around the ceilings, curtains, and more.
I will also be working on an overstuffed, comfy couch for Grandma's living room. Part of my goal with this project is to make as many of the furnishings as I can. I have a small stash of half scale furniture and accessories, but not nearly enough to fill the house.
Showing posts with label Grandma's Summer House. Show all posts
Showing posts with label Grandma's Summer House. Show all posts
Monday, January 13, 2014
Friday, December 13, 2013
Stairs
I've been working on the stairs. For a couple reasons, they weren't easy to construct.
One problem is the warping of the wood in this kit.
Another problem was that I wallpapered before making the stairs.
The stairs curve. Not sure why. It's a bit hard to photograph, because the curve just makes them look oddly crooked in photos.
This is showing the groundfloor stairs.

This is showing the second floor stairs.


Side view. I'll be closing the gap at the bottom of the side with trim.

Here, also.

The sconces will be on the sides of the stairs, one on each floor.
I'm still a few light fixtures short.
The halls will require sconces - of which I have one.
The living room needs two table or standing lamps. I have one table lamp.
The kitchen will have two hanging lamps, which I have.
The bathroom will need a ceiling light of some sort.
The bedroom will need a table lamp - which I have - and possibly an overhead light.
The attic will need three hanging lamps.
I have two more hanging lamps. So I figure I'll need 12 altogether, and I have 7. I'll be scouring Ebay and hoping for coupons/clearance on other sites.
I've drilled holes for the hall sconces and the kitchen lights.
It's funny - the houses usually look 150% better when I'm done. In the process, they look pretty rough. This one will be particularly interesting, since I will need to make most of the furniture.
Sadly, it will be on hold for the next week or so, while I knit cork gnomes and get ready for Christmas.
Saturday, November 30, 2013
Stairs
I'm building staircases. These are odd little stairs. They "curve," which is a bit odd, because they don't actually need to curve. Between the odd stairs and the warping issues, these are pretty rickety looking. The application of spackle once the glue dries should make a huge improvement. Plus, baseboard trim is another help in covering flubs.

Each step has a tab that's meant to slide into a slot on the wall. It's recommended to paint/paper the walls before making the stairs, and I did that. Problem is, that has thrown a bit of a monkey wrench into the tab/slot theory. Some of the tabs I was able to cut down enough to fit them in the slots. Others, I had to completely clip off the tabs.
These photos (poorly taken by me) are all of the second floor stairs.

While I actually like the rickety look of the stairs, I will try to improve them.
A bit of needlework. I'm making a rug for this house. Pretty simple, just stripes, but fun to make, and tiny enough for half scale.

Saturday, November 16, 2013
Walls, floors, lights, and an amusing purchase.
Not a whole lot of time to work on minis this week - my day job has been crazy busy, and I've been exhausted at night, far too tired to build or paint or anything of the sort.
Here's where we left off with Grandma's Summer House. Tonight I started Mod Podging the floors. The unpapered floors will be carpeted.

These are the side walls. I've painted the wood in the windows twice with buttercream acrylic craft paint (buttercream being the color). Clockwise, starting top left, it's bathroom, bedroom, kitchen, living room.

Here is the front wall. The middle section is the hallway, first and second floor.

These are the half-scale lights I have acquired. I'm still trying to decide which rooms they'll go in, and which rooms I'll have to make lights for. At $9-$20 per light, I do not have the budget to buy another 5 or 6 lights. I certainly didn't pay that much for the ones I have, but it's taken me two years to get the ones I have. I can't count on such good deals coming along before May, when this house must be finished. I will challenge myself to make lights, and it will be a good experience. If it's an unsuccessful experience, no big deal - I'll just figure something out.
I do plan to put the Tiffany table lamp in the living room. It occurs to me that there are no overhead living room lights in any of the houses I am familiar with. I'll need at least one more table or floor lamp for that room.
The kitchen will probably need two hanging lamps. I'd ideally like a ceiling light in each hallway; one in the bathroom; ceiling and table lamps in the bedroom; and two or more lights in the attic/guest rooms. Maybe one on the attic stairway to the roof, also.
A minimum of 12 lights, and I've currently got 5.

This is an Ebay buy - and when I saw it, I knew I had to have it. There's a small acrylic paint bottle holding it up, which may give some idea of the size. It's far too big for half scale, but I think it will fit nicely in the Glencroft - maybe over the living room fireplace.


Anyone over the age of 35 related to me on the Bushey side of the family will understand why I had to have this.
I'm feeling pretty good about how this house for the Undersized Urbanite contest is coming along. I'm still doing a lot of thinking and planning - how to install the lights, which pieces to do first, etc.
I must say, I do like the laser cut house kit. Except for the warping - which is likely my own fault: I should have taken the kit out of its box and wrapping when I got it a year ago. The only other quirk is that where it's been laser cut, it has darker edges that do take extra painting to cover. Well worth it to avoid all that sanding with the die cut kits.
Sunday, November 10, 2013
Slowly but surely.
More work on Grandma's Summer House.
I dug through my paper stash to find suitable patterns. I decided to either carpet or linoleum most of the floors; I'm going to electrify this house, and will be running wire either on the ceilings or on the floors.
So I was thinking, left to right:
Living Room walls
Kitchen walls
Kitchen floor
Bathroom walls
Bathroom floor
Bedroom walls
Hallway walls
Attic walls

The living room, bedroom, and attic will be carpeted. The hall floors I decided to use wood patterned paper.

Then, I started gluing in some of the floors. D'oh! I totally flaked on my plan, and used the bathroom floor in the kitchen, and the kitchen floor in the bathroom. Which will be fine.
The kit has four interior doors: 2 on the ground floor, 2 on the second floor. I will only be using the doors on the second floor. I see no purpose in doors between the hallway and living room and kitchen. Pictured above, the blue doors are the front doors. The trim on the right will be painted and glued to them. The white (actually buttercream) doors with the tiny brass knobs will be for the bedroom and bathroom.

Kitchen floor

Hallway floors

Bathroom floor.
One reason I'm sorry that I switched the papers for the kitchen and bathroom is that I used the same papers respectively for the haunted Fairfield. I kinda wanted to change it up for this house. Well, for now I'm leaving it.
The color scheme for the exterior of this house is similar to the way my father had his house painted last: Cream colored, with bright blue doors and chocolaty brown trim. To match his beloved and ancient Siamese cat.
One problem I'm having with this kit is that some of the sheets of wood are warped, due to the way the kit was shrink-wrapped at the factory. I think I can overcome this. I hope.
The floors will get coats of either Mod Podge or polyurethane. I'm also working on a shabby chic ambience with this house (that makes it sound fancy, when in reality we're just shabby).
Friday, November 8, 2013
Stash of half scale furniture
I have a box of half scale furniture. Most of it from Ebay. I've used almost all the pieces I inherited from Mom, in the Fairfield.
This is what I've got:
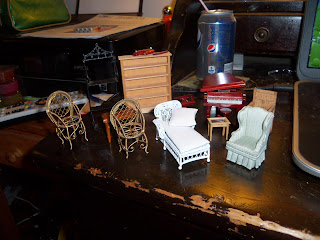
Please ignore my messy desk background. The wicker chaise and the gold metal chairs will go on the rooftop garden. The bookcase is destined for living room. The baker's rack will be in the kitchen; The piano will go in the living room as well as the violin and music stand. The armchair will go in the living room.
Tonight I painted two interior doors. The kit actually has 4 interior doors, but I'm leaving the doors off the downstairs.
Thursday, November 7, 2013
Undersized Urbanite 2014 - Half scale Van Buren

This is the start of my project. It's a half-scale Van Buren, and these are the floors and partitions.
This house will be casual, comfy: Grandma's Summer House.
Ground floor, hallway, kitchen and living room.
Second floor, hallway, bathroom, Grandma's bedroom.
Third floor, guest room.
Rooftop garden/sitting area.
I'm modeling it after the feeling and ambiance of my grandmother's house.
Subscribe to:
Comments (Atom)